> For the complete documentation index, see [llms.txt](https://docs.timeinpixels.com/llms.txt). Markdown versions of documentation pages are available by appending `.md` to page URLs; this page is available as [Markdown](https://docs.timeinpixels.com/nobe-omniscope/features/3d-lut.md).
# 3D LUT & Color Management
OmniScope supports applying color transforms to input sources using **3D LUTs**, **1D LUTs**, **ICC profiles**, and **OpenColorIO (OCIO)** configurations. This lets you preview graded images, match monitor profiles, or convert between color spaces — all without affecting the original signal.
> **A 3D LUT is a lookup table**, not a formula. It samples the RGB cube on a regular grid (commonly 17³, 33³, or 65³ points) and stores the transformed output at each vertex. At runtime, the input color is located inside the cube and interpolated from its eight surrounding vertices using either **trilinear** (fast, cheaper, slightly less accurate) or **tetrahedral** (higher quality, especially for saturated colors) interpolation. A 1D LUT only transforms one channel at a time and cannot do chromaticity changes — it is used for tone shaping (gamma / EOTF conversion) but cannot implement a full camera-to-display color transform. Use 1D LUTs for transfer-function changes, 3D LUTs for gamut-and-transfer changes together.
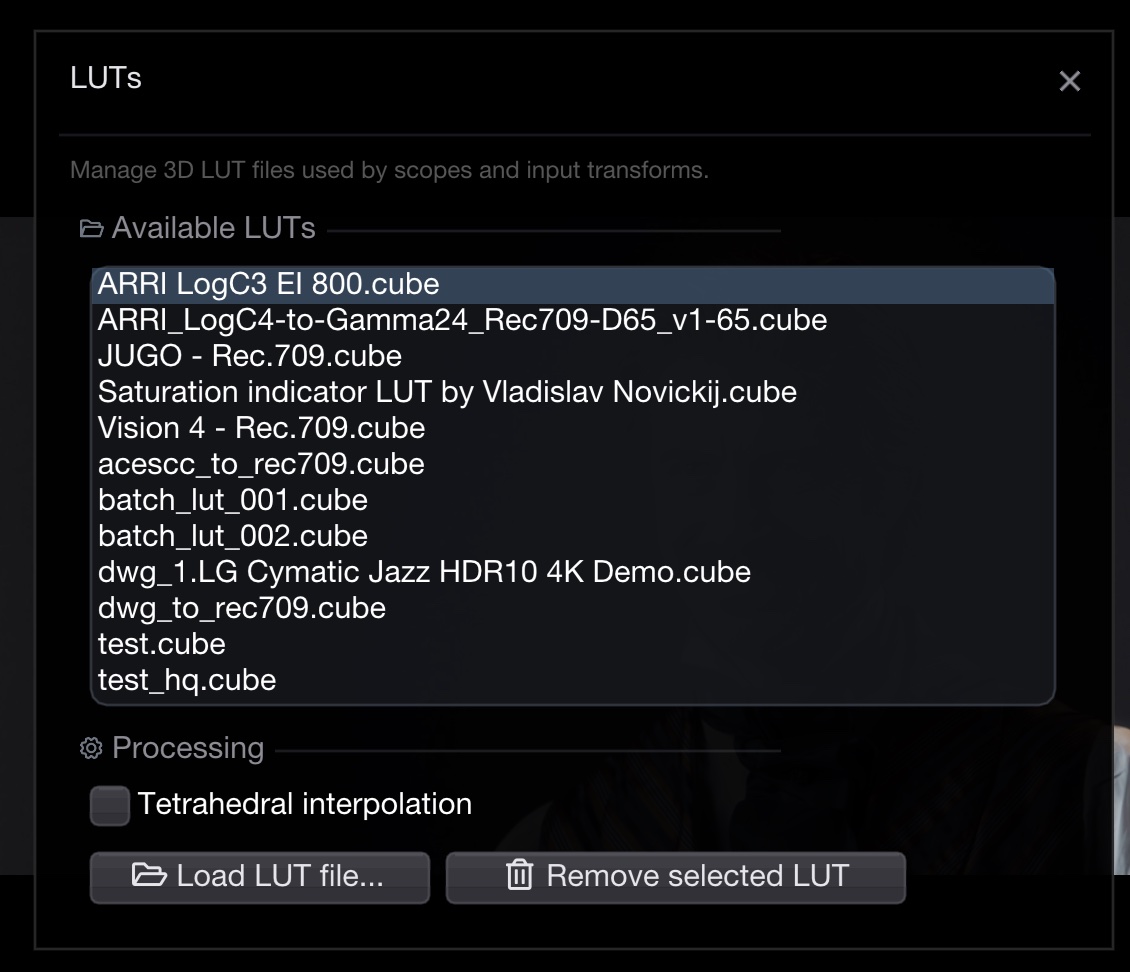
3D LUT browser window
## Input 3D LUT
Each input source can have its own 3D LUT applied before the signal reaches the scopes. This is useful for monitoring how the image will look after a grade, or for converting log/RAW signals to a display color space.
### Applying a LUT
Loading a LUT and applying it are two separate steps:
1. **Add the LUT to the library** — open **Options > 1D/3D Luts**, click **Load LUT file...** and pick your `.cube`. The file is copied into OmniScope's LUT folder, so you only do this once.
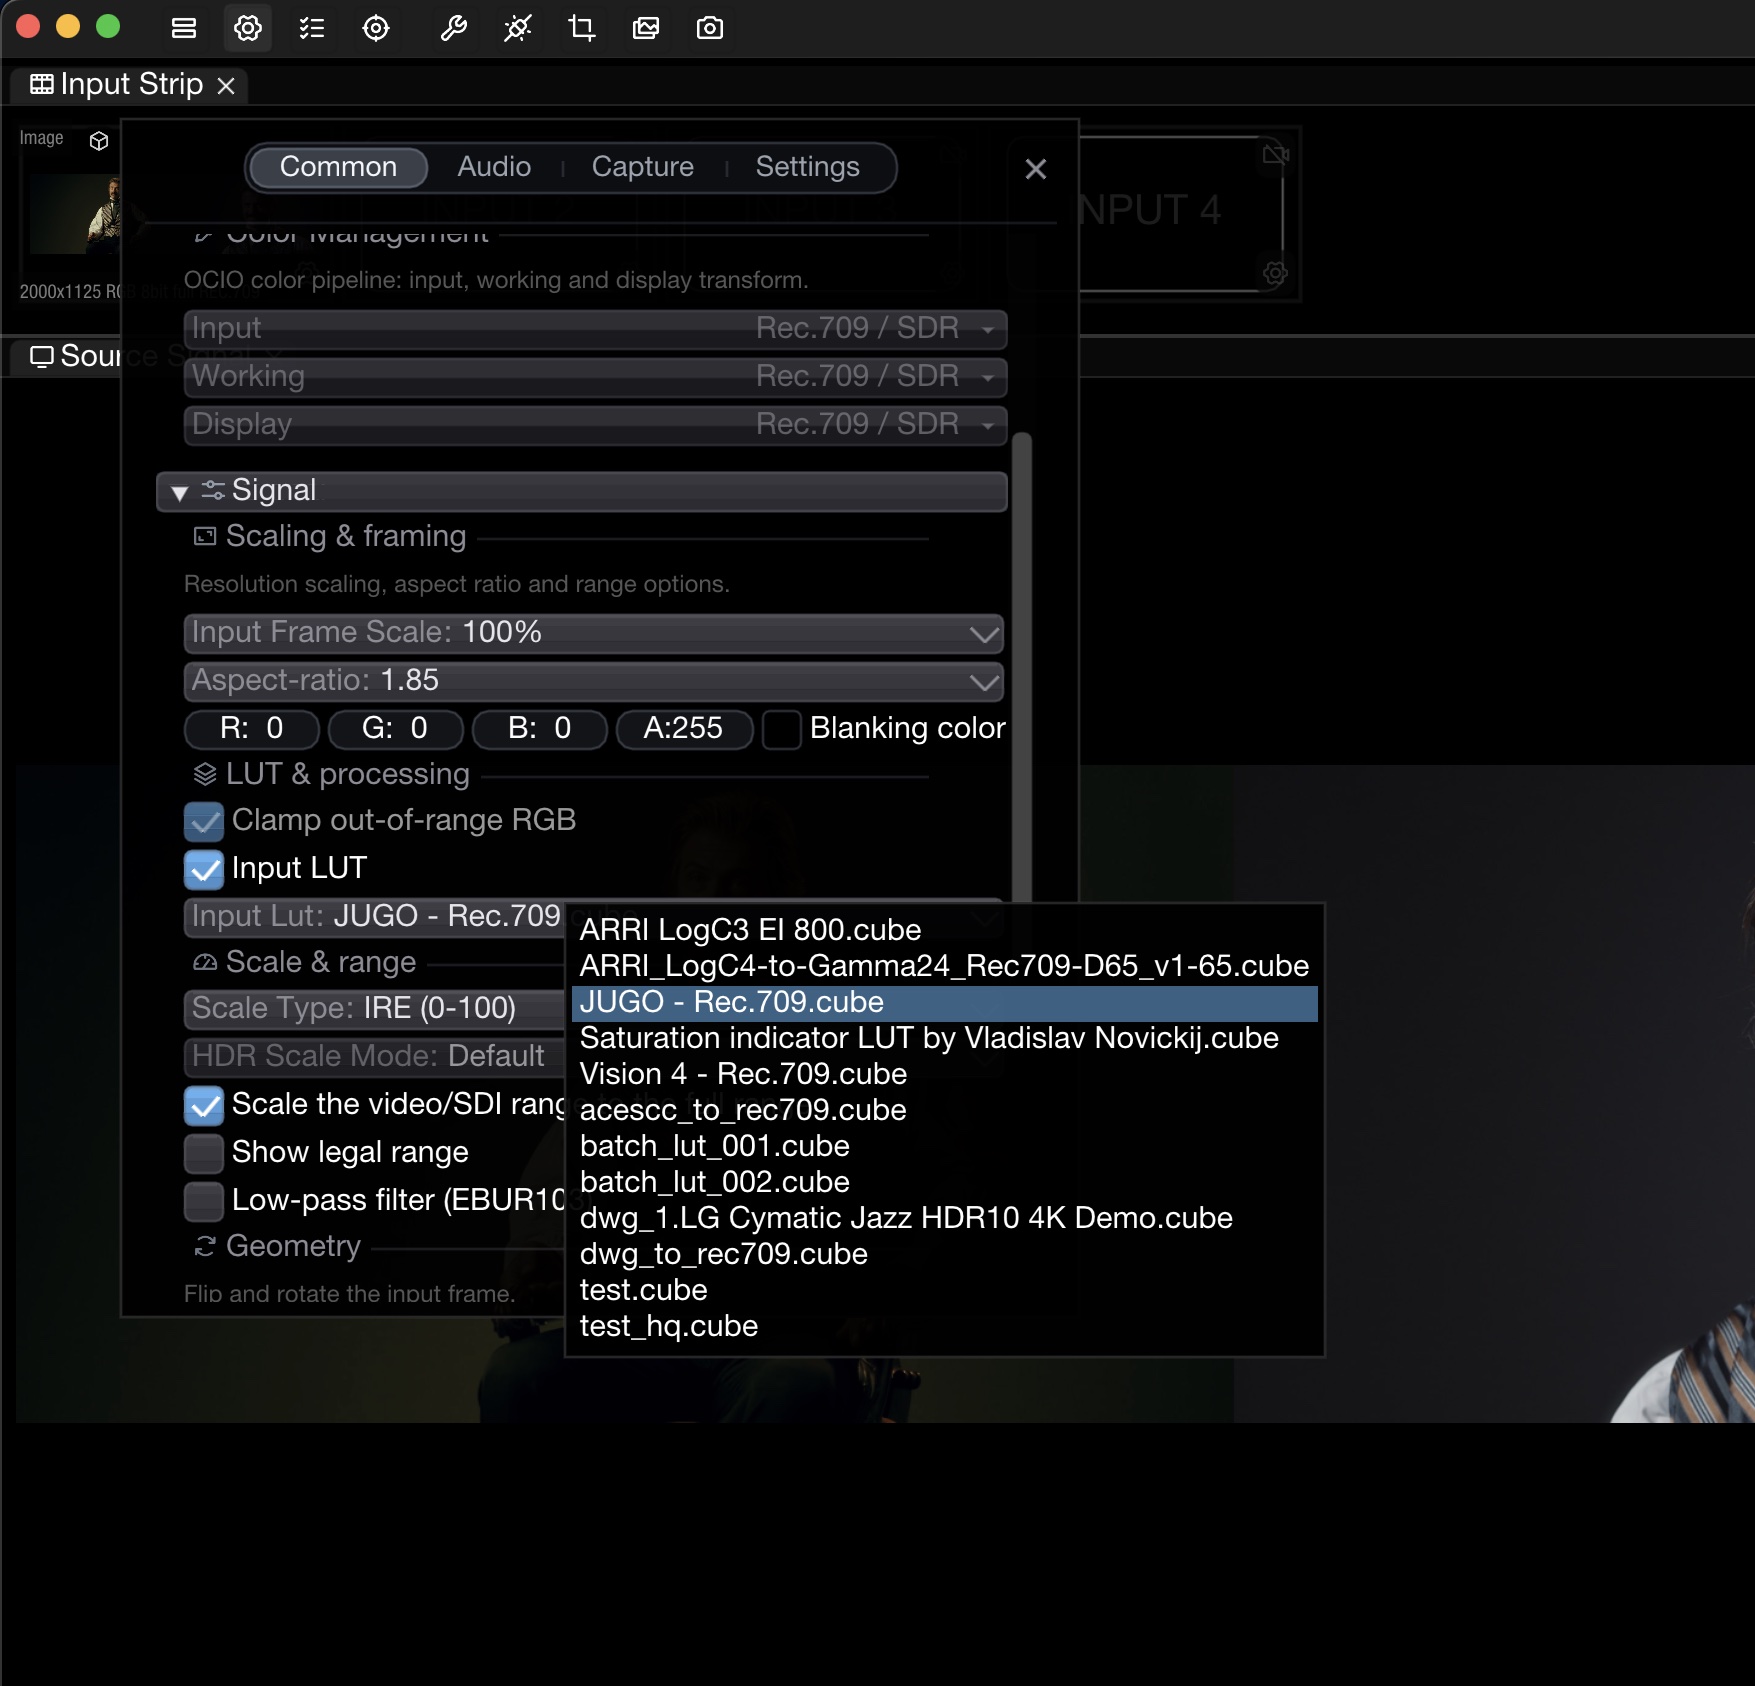
2. **Apply it to a source** — click the **gear icon** on the input's tab in the input strip to open **Input Settings**, go to the **LUT & processing** section, tick **Input LUT**, then choose the file from the **Input Lut** dropdown that appears below it.
The LUT is applied per input slot, so each connected source can use a different transform.
Input 3D LUT enabled in the input settings
### Supported Formats
OmniScope reads the Iridas `.cube` format only.
| Format | Extension | Notes |
| ------ | --------- | ----------------------------------------- |
| 3D LUT | `.cube` | Files declaring `LUT_3D_SIZE` |
| 1D LUT | `.cube` | Files declaring `LUT_1D_SIZE` (1.10.139+) |
Other container formats — `.3dl`, `.csp`, `.spi1d` — are not supported. Convert them to `.cube` first (DaVinci Resolve, Lattice, or `ociobakelut` will all do this).
### LUT Options
| Option | Where | Description |
| ----------------------------------------------------- | ---------------------- | ------------------------------------------------------------------------------------------------------- |
| **Tetrahedral interpolation** | Options > 1D/3D Luts | Higher-quality LUT interpolation (more accurate but slightly slower). Requires an application restart. |
| **Apply Input Settings** | Output device settings | Include the input settings — 3D LUT, aspect ratio, color-space transform — in the NDI/SDI output signal |
| **Apply input 3D Lut to the snapshot when comparing** | Snapshots window | Apply the LUT when comparing snapshots in split mode |
## ICC Profiles
ICC profiles can be loaded to compensate for monitor color characteristics. OmniScope can also read the system's display ICC profile on macOS.
| Setting | Description |
| ----------------------- | ---------------------------------------------------------------- |
| **Display ICC profile** | Use the monitor's ICC profile for accurate color display (macOS) |
| **Custom ICC profile** | Load a specific ICC profile file |
## OpenColorIO (OCIO)
{% hint style="info" %}
OCIO support requires a **Pro** license.
{% endhint %}
OmniScope integrates with **OpenColorIO 2.5.1** for professional color pipeline management. Load a custom OCIO configuration to access all color spaces defined in your pipeline.
* Set the OCIO config path in **Preferences / OpenColorIO**
* Select input and display color spaces from the OCIO configuration
* Color space primaries from the active OCIO config are shown in the **CIE Plot**
### Bundled ACES Config
OmniScope ships with a bundled ACES configuration that does not require any external OCIO setup. In **Preferences / OpenColorIO**, select the ACES version that matches your project:
| Version | Description |
| --------------------- | -------------------------------------- |
| **ACES 1.3** | Standard ACES 1.3 transforms |
| **ACES 2.0 (compat)** | ACES 2.0 with compatibility transforms |
Use the bundled config for ACES monitoring in DaVinci Resolve or other hosts — see [ACES Monitoring (DaVinci Resolve OFX)](/nobe-omniscope/sources/davinci-resolve-ofx/color-managed-timeline.md#aces-monitoring) for the full setup guide.
### ACES in a nutshell
The **Academy Color Encoding System** is a scene-referred, camera-agnostic color pipeline standardized by the Academy of Motion Picture Arts and Sciences. Every ACES transform slots into one of four stages:
| Stage | What it does | Where |
| --------------------------------------- | --------------------------------------------------------------------------------------------------------------------------------------------- | ------------------------------------- |
| **IDT** — Input Device Transform | Converts a specific camera's native color space (ARRI Log C, Sony S-Log3/S-Gamut3, RED IPP2, etc.) to scene-linear ACES2065-1 (AP0 primaries) | Per-source / per-clip |
| **LMT** — Look Modification Transform | Optional creative "look" applied in ACES space, before the output transform. Examples: film emulation, print-emulation LUT, directorial look | Per-sequence / global |
| **RRT** — Reference Rendering Transform | Fixed, canonical tone and gamut rendering from scene-linear to an intermediate display-referred space (OCES) | Global (part of the Output Transform) |
| **ODT** — Output Device Transform | Maps the RRT output to a specific display — Rec. 709 sRGB, Rec. 2020 PQ 1 000 nits, P3-D65 2 000 nits, DCI-P3, etc. | Per-output |
Working in ACES has two big advantages for scope analysis: (1) every camera looks like every other camera in the working space, so exposure and white-balance calls are apples-to-apples, and (2) the IDT — not the LUT chain — handles the camera conversion, so decisions about "what should this neutral gray be at" are stable across clips. The trade-off is that you must apply the matching ODT before looking at the picture on a display-referred monitor. OmniScope's OCIO support puts the ODT selection in your hands.
## 3D LUT / ICC Scope
The dedicated [3D LUT / ICC scope](/nobe-omniscope/scopes/3d-lut-icc-profile.md) shows the effect of the color transform in a separate viewer, letting you compare the original and transformed image.
## Keyboard Shortcuts
| macOS | Windows | Action |
| ----- | ------- | ---------------------------------- |
| ⌥D | Alt+D | Toggle input 3D LUT on all sources |
{% hint style="info" %}
The toggle only acts on sources that already have a LUT selected in the **Input Lut** dropdown — if no LUT has been chosen yet there is nothing to switch on, and the shortcut appears to do nothing.
{% endhint %}
A per-source **Toggle input 3D LUT** action is also available, and can be bound to a key under **Options > Keyboard actions** or to a Stream Deck button.
## Related
* [3D LUT / ICC Scope](/nobe-omniscope/scopes/3d-lut-icc-profile.md)
* [False Color](/nobe-omniscope/scopes/false-color.md) — can export a 3D LUT
* [Available Actions](/nobe-omniscope/streamdeck/available-actions.md)